Building Custom Columns
One of the more daunting tasks of my 'Never Ending
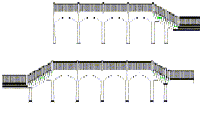
Deck Project' is the construction of 13 load bearing classical styled columns that support a series of archways. The deck has two major
areas that are connected by a causeway.
 My initial reaction was to purchase maintenance-free columns either constructed out of fiberglass or Poly-Stone but as I searched around
for ready-made columns in the diameter range of 12"-14" I was disappointed to find them in the $400-$800 (or more) range. With needing so
may on them and given the money already spent on the deck, I decided I would need to find an alternative.
One of my main goals for our deck was for it to be as maintenance-free as possible. But I knew if I was going to make columns
they would have to be made from wood. I spent some time thinking about the different types of woods that offer rot-resistence
but this always led me towards more expensive exotic woods. This got me to start looking at methods to seal the wood instead of
 concentrating on wood species and that was when I came across sealers designed for restoring rotten wood in wooden boats. I figured
if they could come up with a method to seal wood for the long term then I could get away with using a common (read cheap) wood. The
sealer I decided to use was a deep penetrating epoxy resin. The sealer is designed to be viscous enough to penetrate the wood fibers
so that once it is cured, the wood is encased in a layer of epoxy resin.
Since the type of wood was no longer important, I decided to search for the most economical wood materal for the project. I decided
to try plain old 2x4s and set off making a prototype. The soft wood used to make 2x4 studs would also readily absorb the epoxy sealer
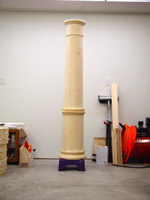
providing a thicker epoxy shell. My first step was to design the shape of the column. Since the
 column would be load bearing I needed to minimize the amount of material I would remove in the lathe. The design and construction method
required that I construct the shaft sections separate from the moulding sections of the base and capital. I would construct the shafts
in the same process that barrels are constructed using a series of staves glued together to form a hollow cylinder. While the base and
capital would be constructed from stacks of laminated rings.
Another design consideration that comes with wood construction is what type of glue to use. An exterior glue is required so my first
instinct was to use Gorilla Glue. Gorilla Glue is my favorite waterproof wood
glue but it
 does not come in quantities larger than 36oz bottles and it is NOT cheap. I would need a couple gallons of it for this project and
that was going to be expensive so I investigated some other types of glues. TiteBond had recently released their water-resistant
TiteBond III and the cost was considerably less than Gorilla Glue. I almost had myself talked into the TiteBond III until I
was reading my latest Wood Magazine and, as luck would have it, they were rating the performances of wood glues. I was surprised at the strength of PVA based glues compared
to the Gorilla Glue. The Gorilla Glue was rated much less than the TiteBond varieties on joint strength for interior applications.
BUT, when it came to exterior applications, the Gorilla Glue showed no degraded performance and even increased slightly
while the PVA glues and the TiteBond III performaces plummeted. After 24 hours of submersion, the Gorilla Glue was much stronger than
the TiteBond III. With that knowledge, it was time to start searching for the best price on Gorilla Glue.
Building the Bases and Capitals
Time to start cutting wood! The first task was to create the rings used for the base, middle and capital sections of the columns. These
parts of the column call for a series of stacks of rings, each 2 to 3 layers thick. The ring stacks are
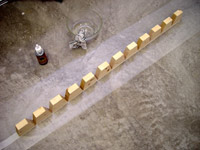 glued up, routed and then assembled to create the final sections. Each ring layer is assembled from 12 pie shaped blocks glued
together. And each column needs 11 rings requiring over 1000 pieces for the entire set of columns. I first ripped off the top and
bottom of the 2x4s to remove the rounded egde of the studs. I guess I really need a planer! I then cut each
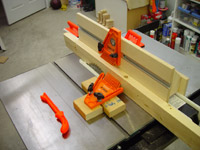
8 foot stud in half for convience and then set out to cut the pies. I quickly replaced my cheap grizzly miter gauge with an
Osbourne EB-3 and have been really pleased with its accuracy. In addition
to the accuracy of the EB-3, the extra long fence of this miter gauge really comes in handy when cross-cutting long boards.
I guess I really should buy a miter saw as well.
 Let the glue flow! To aid in the glue-up of the rings I found it best to lay out a strip of filament strapping tape and stick the pies
in a row to the tape. This way, after I apply the glue I can pick up the end of the tape and roll up the pieces into a ring. The tape
will hold the pieces in place until they are clamped. Working with polyurethane glues can be really messy and the glue, once cured,
will not come off your hands. It is advisable to wear gloves or be really really neat. Gorilla Glue is applied to only one mating surface
and the other surface is dampened with water. I found it best to dampen all of the required surfaces first and then apply the glue.
I would squirt enough glue on each block and then once all 12 were done, I would go back with a flat thin board (I used plastic shims
designed for shimming door jambs) and spread out the glue to cover the entire surface. Then I rolled up the pieces into a ring and
taped the ends together. You'll want to have wax paper down for this operation as glue does drip everywhere.
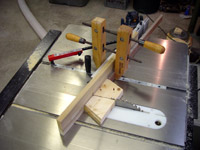
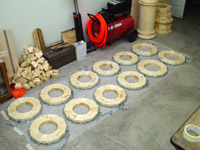
 With the ring taped up, its time to clamp it. A band or strap clamp is perfect for clamping a 12 sided assembly but I wasn't about
to buy the number of clamps I would need plus the glue that cured on the straps would quickly become a nuisance to remove between
glue-ups. I found a solution on the Internet where another column builder used chain and vise-grips to clamp togeter the column
while it glued. This seemed like a much better solution, except I opted to save a few bucks and replaced the vise clamps with
J-Bolts that I could quickly hook into a link and draw it up tight with a cordless drill. You can easily apply enough force with
this system to draw up the joints. You'll also discover how accurate your miter gauge really is as a fraction of a degree of error
will readiliy show up at this point. Tip: Dry fit one the first one you cut and make any necessary adjustments to
the miter at that point.
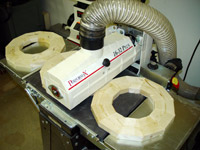
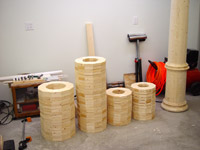
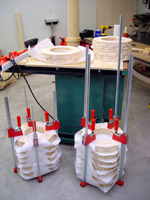 After all the rings were glued together it was time to glue up the stacks. First the squeeze out needed to be scraped off and then each
ring snaded flat. That called for a trip to dad's house to borrow his Performax sander. I guess I need one of them too.
Santa is going to find it tough to get all this necessary stuff down the chimmney. Groups of 2 and 3 rings were then glued together and
stacked for clamping. Wax paper was placed between the stacks to keep the glue from running all over and gluing the separate stacks
together. After the rings have cured they were set aside and attention was turned towards the top and bottom shafts of the column.
Building Column Shafts
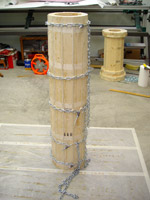 The top and bottom shaft section of the column are constructed from 2x4s ripped with the proper taper and bevel. A pair of taper jigs
were created to speed up the cutting process. Like the standard architectual columns, the taper of my columns is not straight but
rather follows a slight curve to create the appearance of a bulge
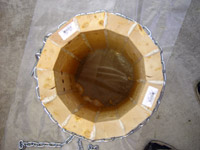 about 2/3rd the way up the column. This feautre is called the entasis and gives the illusion that the column is supporting
considerable weight. The taper was calculated to minimize the amount of material removal during the turning.
The shafts were glued up in the same fashion as the rings using tape to hold the staves in place as glue was applied and the
assembly rolled up to form the shaft. Serveral chains were used to draw up the pieces while the glue cured.
Turning the Pieces
I knew exactly what machine I needed to turn my columns; a Legacy Ornamental Mill. Unfortunately, the standard models offered by Legacy,
while really nice, came up short for my needs. There were two main short-comings. The biggest was the fact that the Legacy units could
only handle parts up to 10 inches in diameter. My largest part would be 16 inches in diameter finished,
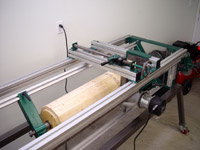 requiring at least 18 inches of capacity. In short, I opted to build a machine incorporating the basic Legacy design but added in
some other extra features and expanded its capacity to suit my needs. Needless to say, this turned into a project of its own and you
can find more information about that adventure on my ornamental mill page.
The basis of the ornamental mill design is to rotate the work similar to a standard lathe setup albeit much slower, and replace the handheld
lathe cutting tools with a fixed router that can be moved along 2 axis. The advantage is that the high
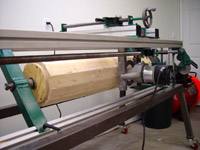 speed router bit can quickly remove material while leaving a very smooth surface. This requires a lot less sanding. The slow
rotational speed of the material also means there is minial vibrations created by out of balance shafts.
The capital and base pieces were turned on the same machine. The headstock and tailstock of the ornamental mill are equipped with
industry standard R-8 spindles. That allows for a wide variety of different types of tool holders to be used. To turn the capital
and base pieces, a 1" R-8 arbor was chucked into the head stock upon which that rings are attached. All operations were done using
a climb-cut to minimize tearout. It took 12 different sized cove, straight and round-over bits to produce the profiles. The cove
and round-over bits required removal of their guide bearings and the bearing studs which were ground off with a grinder and dremel
tool. This allowed the bits to be slowly plunged into the work as it turned and cut the different profiles without interferance from
the bearings. More photos of the turning operations will be posted as they become available.
Final Assembly
Once all the pieces are turned they will then be completely sealed with a penetrating epoxy resin used in the wooden boat restoration
market. I have not yet reached this point as I will wait until my first 6 columns are ready for sealing. I plan to use a product
called CPES (Clear Penetrating Epoxy Sealer) from The Rot Doctor. This epoxy sealer
is designed to deeply penetrate the wood surface. After the pieces have been sealed, they will be stacked up and glued to form the
complete column. The columns will then be painted white prior to installation on the deck.


